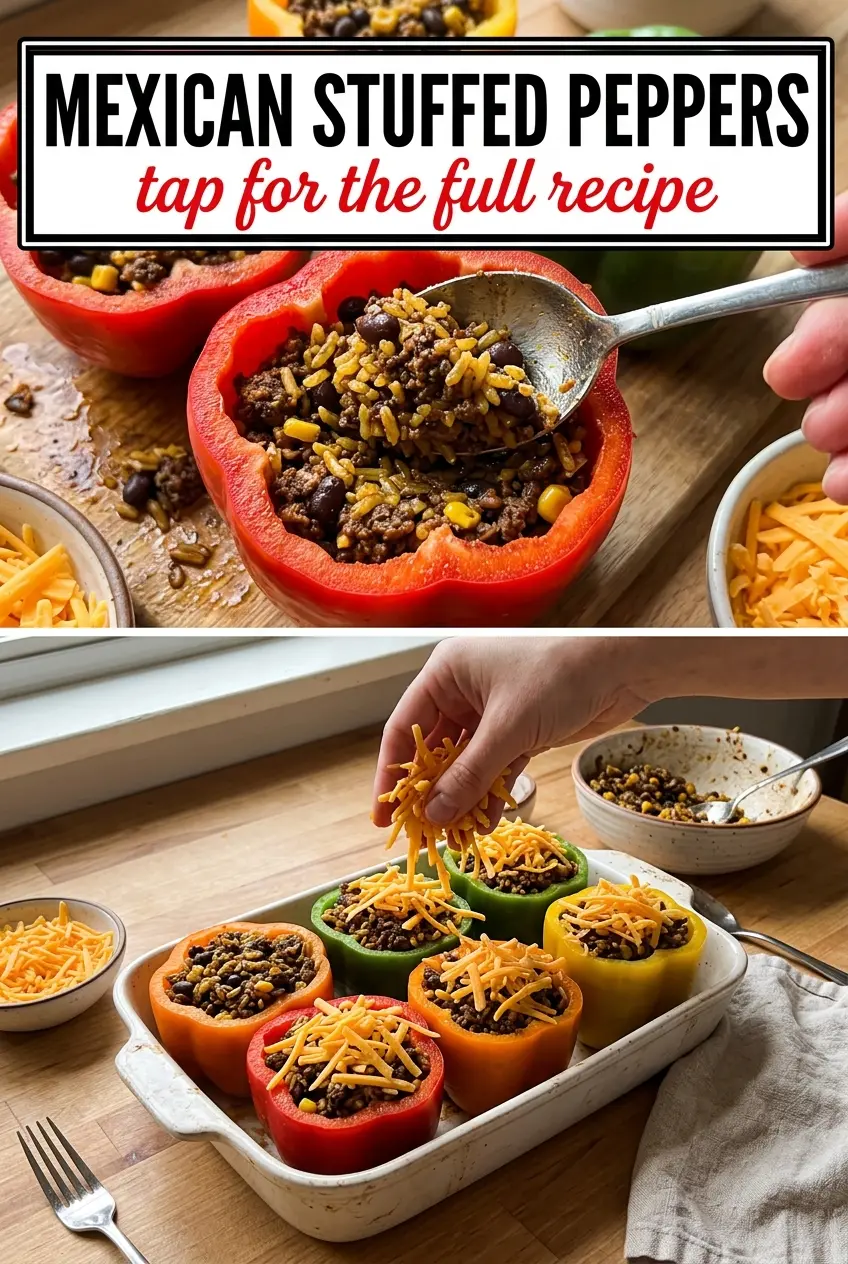
Roasted peppers make the whole dish. Their skins go blistered and a little smoky, then the flesh softens just enough to hold a hearty filling without collapsing in the oven. What you get at the end is a neat, spoonable dinner with melted cheese on top, savory beef and rice inside, and enough brightness from salsa, tomato, and cilantro to keep each bite from feeling heavy.
The part that makes this version work is balance. The filling isn’t just meat; it’s meat plus rice, beans, and corn, which gives you a proper stuffed-pepper texture instead of a dense skillet pile that falls apart on the plate. Salsa roja brings seasoning and moisture at the same time, so the filling stays cohesive without turning watery, and the peppers hold up better after roasting than if they were stuffed raw.
Below, I’ve included the small details that matter most: how to get the peppers tender without tearing them, why the filling should be thick before it goes in, and a few swaps that keep the recipe flexible if you’re using what you already have.
The peppers held their shape and the filling was thick, not runny, which made serving so much easier. I used mozzarella and it melted beautifully over the top.
Save these Mexican stuffed peppers for the nights when you want smoky roasted peppers, a hearty beef-and-rice filling, and a bubbling cheese top in one pan.
The Secret to Stuffed Peppers That Don’t Turn Watery
The biggest mistake with stuffed peppers is treating the pepper like a baking dish and the filling like a casserole. If the filling is loose when it goes in, the peppers release their own moisture and the whole thing turns soft in a hurry. Roasting the peppers first changes that. It drives off some surface water, gives you a little char for flavor, and starts the softening before the filling ever hits the pan.
The other thing worth paying attention to is the filling texture. It should look thick enough to mound on a spoon, not soupy. Rice and beans absorb the salsa and tomato as the filling simmers, and that short simmer is what helps everything settle into one cohesive mixture instead of separating in the baking dish.
- Poblano or bell peppers — Poblanos bring more flavor and a little heat; bell peppers are milder and usually a touch easier to stuff. Either one works, but the pepper should be large enough to stand upright after roasting.
- Ground beef — Use a lean-to-moderate grind so the filling stays savory without pooling grease. If yours is very fatty, drain it after browning so the peppers don’t end up oily.
- Salsa roja — This does the seasoning work that broth or plain tomato sauce can’t fully replace. A thicker salsa is better here because it seasons the filling without making it thin.
- Oaxaca or mozzarella cheese — Oaxaca melts with a soft, stretchy finish, while mozzarella gives you a similar melt with a cleaner supermarket swap. Pre-shredded works, but freshly shredded melts more smoothly.
Building the Filling Before It Goes Into the Peppers
Roasting the Peppers First
Char the peppers until the skins are blistered and blackened in spots all over, then trap them in a bag long enough for the steam to loosen the skins. That steaming step matters more than it sounds like it should; it’s what lets you peel the peppers without shredding the flesh. If the skin won’t slip off easily, steam them longer instead of scraping aggressively.
Cooking Out the Moisture in the Filling
Brown the beef with the onion until the meat has real color and the onion looks translucent, not pale and wet. Add the garlic for just a minute so it perfumes the pan without burning. When the rice, beans, corn, salsa, and tomato go in, let the mixture simmer until it looks thick and spoonable. If it still sloshes around in the pan, it’s too loose for stuffing.
Stuffing and Baking for the Best Melt
Use a baking dish that holds the peppers snugly so they don’t tip over and spill. Fill each pepper firmly, but don’t pack so hard that the skins split. The final bake is just long enough to melt the cheese and warm the centers through; if you bake them too long, the peppers collapse and the filling dries out at the edges.
Make It Mild or Add More Heat
Use bell peppers instead of poblanos for a gentler version, or keep the poblanos and add diced jalapeño to the filling if you want more bite. The peppers themselves matter here because they shape the whole eating experience, not just the color of the dish.
Turn It Vegetarian
Swap the beef for an extra cup of black beans or a mix of black beans and crumbled tofu browned with the onion. You’ll lose some of the meaty richness, but the salsa, cumin, cheese, and roasted pepper still carry the dish well.
Go Gluten-Free Without Changing the Texture
This recipe is naturally gluten-free as written if your salsa is certified gluten-free. The important part is checking the salsa label, since that’s the one packaged ingredient most likely to hide unnecessary additives.
Storage and Reheating
- Refrigerator: Store leftovers in an airtight container for up to 4 days. The peppers soften a bit more as they sit, but the flavor holds up well.
- Freezer: They freeze fairly well for up to 2 months, though the pepper texture will be softer after thawing. Wrap each stuffed pepper tightly and freeze in a single layer before moving them to a bag or container.
- Reheating: Reheat covered in a 350°F oven until hot in the center, usually 15 to 20 minutes. The common mistake is microwaving too long, which makes the pepper leathery and the cheese rubbery before the middle is fully warmed.
Answers to the Questions Worth Asking
Mexican Stuffed Peppers
Ingredients
Equipment
Method
- Roast peppers directly over a gas flame or under the broiler until charred all over, about 5 minutes, turning as needed so the skin blisters evenly (visual cue: dark char patches).
- Place peppers in a plastic bag for 10 minutes to steam, which loosens the charred skin (visual cue: skins look softened).
- Peel off the charred skin carefully and keep each pepper intact (visual cue: pepper flesh is smooth and intact).
- Make a careful slit down the side and gently remove seeds, keeping the pepper shell whole (visual cue: hollowed pepper with intact walls).
- Brown ground beef with diced onion in a large skillet over medium-high heat (visual cue: beef is no longer pink).
- Add garlic and cook 1 minute, stirring until fragrant (visual cue: garlic smells sharp and aromatic).
- Stir in cooked rice, black beans, corn, 1/2 cup cheese, salsa, tomato, cumin, salt, and pepper, mixing until evenly combined (visual cue: thick filling with visible beans and corn).
- Simmer for 5 minutes to meld flavors (visual cue: mixture bubbles gently throughout).
- Stuff each roasted pepper with the meat mixture and place them in a baking dish (visual cue: peppers are generously filled).
- Top with the remaining cheese and bake at 350°F for 20 minutes until cheese is melted (visual cue: cheese is bubbling and browned at edges).
- Garnish with chopped cilantro before serving (visual cue: bright green flecks on top).