
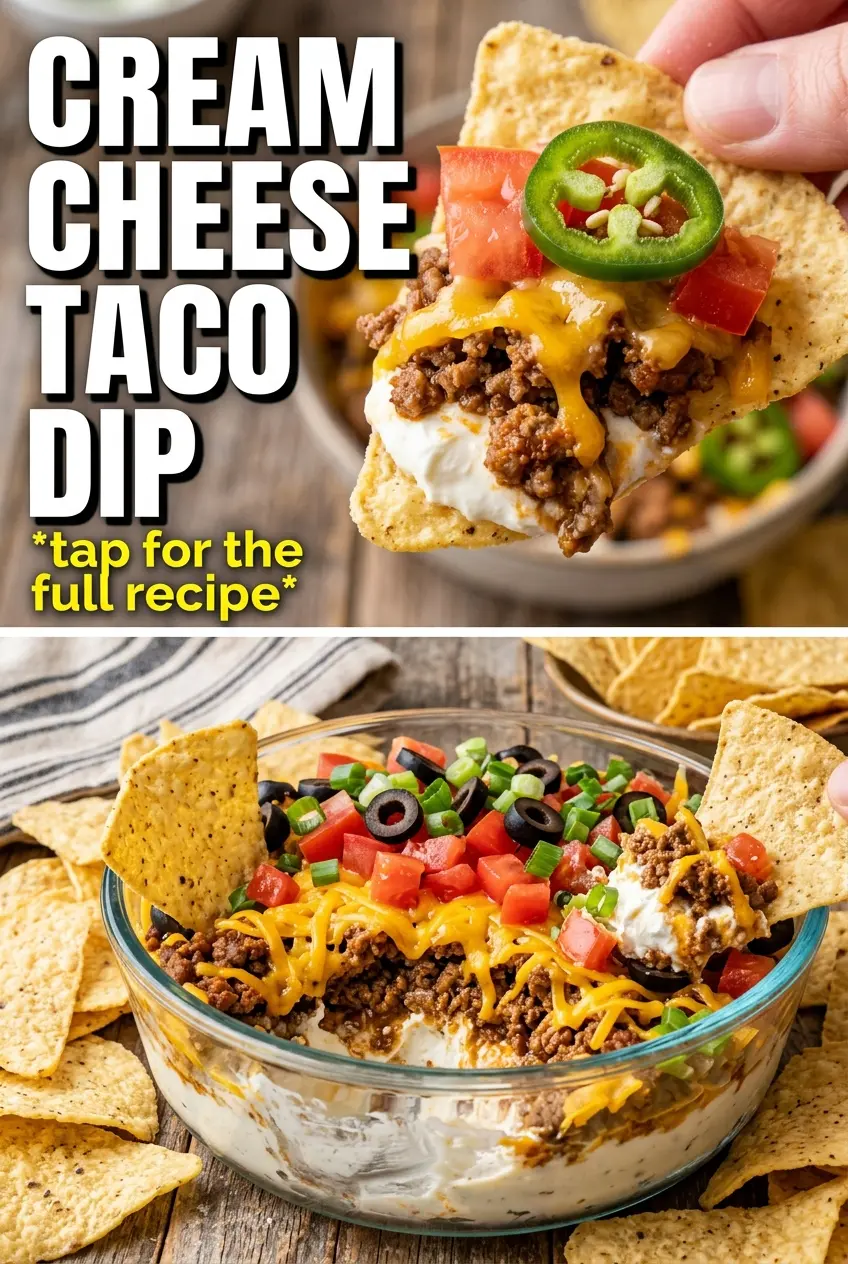
Cream Cheese Taco Dip disappears fast because it hits that sweet spot between creamy, beefy, and salty with just enough heat to keep people reaching for one more chip. The base stays cool and rich under the warm taco beef, and the melted cheddar pulls everything together into a scoopable layer that holds its shape without feeling heavy. It’s the kind of appetizer that gets set down at the table and suddenly everyone is standing around it.
What makes this version work is the balance of texture. The cream cheese softens into a smooth layer, the seasoned beef gets a little saucy from the salsa, and the cheese on top melts into the meat instead of sliding off it. That layered approach keeps the dip from turning oily or muddy in the oven. A shallow baking dish helps too, since the heat moves evenly and every chip gets a good mix of creamy base and beefy topping.
Below you’ll find the small details that keep the dip from separating, plus a few smart variations if you want to lighten it up or stretch it for a bigger crowd.
The cream cheese layer stayed smooth, and the beef mixture didn’t make the dip watery at all. I used a little extra jalapeño on top and my guests kept going back until the dish was scraped clean.
Like this Cream Cheese Taco Dip? Save it to Pinterest for game day spreads, potlucks, and quick party snacks with a creamy, cheesy taco topping.
The Secret to Keeping the Layers Distinct, Not Smeared Together
The biggest mistake with layered hot dip is mixing everything into one pan and hoping the oven will sort it out. It won’t. The cream cheese needs to stay underneath as a cool, thick base so it can balance the hot beef and melted cheddar above it. If the beef mixture is too loose, the whole dip turns soupy around the edges before the cheese has a chance to melt cleanly.
Drain the beef well after browning. That’s the difference between a dip that scoops neatly and one that leaves grease pooling in the dish. The salsa adds just enough moisture to bind the taco seasoning without turning the meat runny, so don’t overdo it. A shallow baking dish matters too because it spreads the dip into a thinner layer that heats through fast and stays easy to serve.
What Each Ingredient Is Actually Doing in This Dip
- Cream cheese — This is the base that gives the dip its body and cool, rich contrast. Let it soften first so it spreads without tearing the surface of the dish. Cold cream cheese will clump, and once it bakes, those clumps stay there.
- Ground beef — The beef gives the dip its taco-shop backbone. Use lean enough meat that you’re not fighting off excess grease, but don’t go extra-lean if you want good flavor. If you need a swap, ground turkey works, but it needs a little extra salt or a spoonful of oil to keep it from tasting flat.
- Taco seasoning — This does more than add spice; it seasons the beef and helps create that familiar taco dip flavor in one step. A packet is fine here because it’s consistent and built for this kind of quick dish. If you use homemade seasoning, keep an eye on salt because homemade blends vary a lot.
- Salsa — Salsa loosens the meat just enough so it spoons well over the cream cheese. Chunky salsa adds texture, while a smoother one blends in more. If your salsa is very watery, let it cook for a minute or two with the beef so the excess liquid cooks off before assembling.
- Cheddar cheese — Cheddar melts into a tidy top layer and gives the finished dip that browned, stretchy finish people expect. Pre-shredded cheese works, but freshly shredded melts a little smoother because it doesn’t have anti-caking starch on it.
- Jalapeños and green onions — These go on at the end for freshness and bite. Bake them and they lose their brightness. Add them after the dish comes out of the oven so the top still looks fresh and the flavors stay sharp.
Assembling It So the Oven Works for You
Browning the Beef Fully
Cook the ground beef over medium heat until no pink remains and the bits on the bottom of the pan start to brown, not just gray. That browning adds depth that you can’t get from seasoning alone. If the pan is crowded or the heat is too low, the meat steams and the final dip tastes flatter. Drain the fat before you add the taco seasoning and salsa so the mixture thickens instead of sliding around.
Building the Taco Layer
Stir the seasoning and salsa into the hot beef while the skillet is still on the heat. The salsa should coat the meat, not puddle underneath it. If the mixture looks too loose, give it another minute or two in the pan so the liquid reduces a bit. You want a spoonable filling, not a taco soup.
Spreading the Cream Cheese Base
Work with softened cream cheese so it spreads in an even layer across the bottom of the dish. If it’s still cold, it will tear the surface and bake up patchy. A thin, even base is better than a thick one, because it warms through without staying cold in the center. An offset spatula or the back of a spoon helps get it level all the way to the corners.
Baking Until the Top Melts Cleanly
Spoon the beef over the cream cheese, then cover it with cheddar so the meat is sealed in. Bake at 350°F until the cheese melts and the edges look hot and bubbly, about 15 minutes. If you bake it too long, the cream cheese layer can loosen and the top starts to dry out. Add the jalapeños and green onions after baking so they stay bright and don’t lose their bite.
How to Adapt This for a Bigger Crowd or a Different Diet
Make It Lighter with Ground Turkey
Ground turkey works well if you want a leaner dip, but it needs help with flavor and moisture. Add a teaspoon of oil while browning and keep the salsa from getting too thin so the filling still feels rich. The result is a little less savory than beef, but still plenty satisfying with chips.
Make It Spicier Without Changing the Base
Add more diced jalapeños or use a hot salsa in the beef mixture if you want more heat. Keep the cheese layer the same so the dip still tastes balanced and doesn’t turn harsh. A little heat goes a long way once the cream cheese and cheddar are involved.
Make It Gluten-Free Without Changing the Flavor
This dip is naturally gluten-free as long as your taco seasoning and salsa are labeled gluten-free. That’s the part people miss, since some seasoning packets use thickeners or fillers. Serve it with corn tortilla chips and you’ve got the same bold taco flavor with no extra work.
Stretch It for a Party Pan
For a larger crowd, use a wider baking dish and double everything evenly. The key is to keep the layers thin enough that the center heats through at the same time as the edges. If you pile it too high, the top melts before the middle gets hot.
Storage and Reheating
- Refrigerator: Store leftovers covered for up to 3 days. The cream cheese base firms up in the fridge, but the flavor holds well.
- Freezer: Not the best choice. Cream cheese can turn grainy after freezing and thawing, so the texture won’t be as smooth.
- Reheating: Reheat in a 325°F oven until hot in the center, or warm smaller portions in the microwave in short bursts. Don’t blast it on high heat, or the cheese can separate and the edges dry out before the middle warms through.
Answers to the Questions Worth Asking
Cream Cheese Taco Dip
Ingredients
Equipment
Method
- Brown the ground beef in a skillet over medium heat, breaking it apart as it cooks for about 8 minutes until no longer pink.
- Drain excess fat, then stir in the taco seasoning and salsa until evenly combined.
- Spread the softened cream cheese in the bottom of a shallow baking dish to form an even base.
- Top with the cooked seasoned beef mixture, spreading it into a single layer.
- Sprinkle the shredded cheddar cheese evenly over the beef.
- Bake at 350°F for 15 minutes, until the cheese is fully melted and looks bubbly at the edges.
- Top the hot dip with diced jalapeños and chopped green onions for a fresh, colorful finish.
- Serve immediately with tortilla chips for scooping.


