
Sticky honey garlic chicken earns its place in the dinner rotation because the sauce clings instead of running off the plate. The chicken sears first, so you get browned edges and a glaze that hits the pan already warmed by those drippings. That combination gives you sweet, savory, and garlicky all in one bite, with a finish that looks glossy and tastes like it took more work than it did.
The key is building the sauce in the same skillet after the chicken comes out. Those browned bits at the bottom are what keep the glaze from tasting flat. A quick cornstarch slurry turns the honey-soy mixture into something sticky enough to coat every piece, while a little rice vinegar keeps the sweetness from taking over. If you’ve ever had honey garlic chicken slide into a thin, sugary sauce, this version fixes that.
Below, I’ve added the small details that matter most: how to keep the chicken juicy, when to add the garlic so it doesn’t scorch, and what to change if you want to swap in thighs or make it gluten-free.
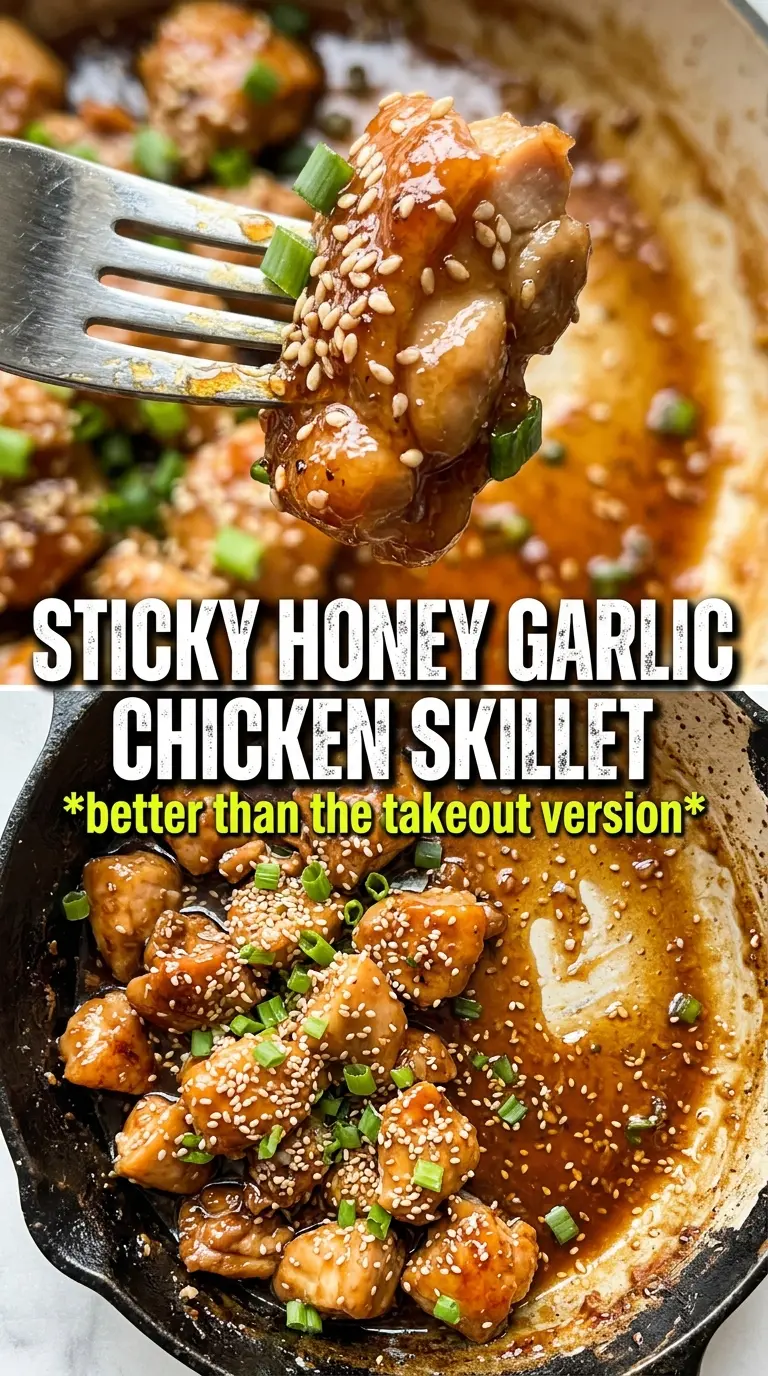
The glaze turned out glossy and sticky without getting cloying, and the garlic stayed fragrant instead of bitter. I served it over rice and the sauce pooled just enough to coat every bite.
Love this sticky honey garlic chicken? Save it to Pinterest for a fast skillet dinner with a glossy sauce that clings to every bite.
The Step That Keeps the Glaze Sticky Instead of Thin
The biggest mistake with honey garlic chicken is rushing the sauce before the pan has built any flavor. If you add everything to a clean skillet, the glaze tastes one-note. When you sear the chicken first, the browned residue melts into the sauce and gives it depth without needing extra ingredients.
Heat matters here, too. Garlic burns fast, and burnt garlic makes the whole dish taste sharp and bitter. Cook it just until fragrant, then move straight into the honey, soy sauce, and vinegar so the pan drops from scorching hot to a gentler simmer before the garlic has a chance to go too far.
What Each Ingredient Is Actually Doing in This Dish
- Chicken breasts — Boneless, skinless breasts cook quickly and give you a clean surface for the glaze to cling to. If you prefer thighs, they stay juicier and are more forgiving, but they’ll need a little longer in the skillet.
- Honey — This is what makes the sauce sticky and glossy. Use real honey, not a syrup substitute, because you need its natural thickness and caramelizing power.
- Soy sauce — It brings salt and savory depth so the sauce doesn’t taste like candy. Low-sodium works well if you want a little more control, especially if your soy sauce runs salty.
- Rice vinegar — This cuts through the sweetness and keeps the glaze balanced. If you don’t have it, apple cider vinegar works, but use a lighter hand because it can read sharper.
- Cornstarch slurry — This is what turns the sauce from thin to lacquered. Stir it in after the sauce is simmering; if you add it too early or dump it straight in dry, you’ll get lumps instead of a smooth glaze.
- Butter and garlic — Butter softens the sharp edges of the garlic and helps the sauce taste rounder. Fresh garlic matters here; jarred garlic won’t give the same punch or aroma.
How to Sear, Glaze, and Finish the Chicken Without Losing the Coating
Getting a Good Sear on the Chicken
Season the chicken well before it hits the skillet, then let it sit in the hot oil without moving it for a few minutes. You’re looking for a deep golden crust that releases easily from the pan; if it sticks, it needs another minute. Don’t crowd the skillet, or the chicken will steam and the glaze will never have that browned base to work from.
Building the Honey Garlic Sauce
After the chicken comes out, drop the heat slightly and cook the garlic in butter just until it smells sweet and sharp at the same time. Stir in the honey, soy sauce, and rice vinegar, scraping the bottom of the pan as the liquid loosens the browned bits. If the garlic turns dark before the liquids go in, start over; bitter garlic will carry through the whole sauce.
Thickening to a Sticky Glaze
Once the sauce is bubbling, add the cornstarch slurry and keep it moving. In 2 to 3 minutes, it should go from thin and foamy to glossy and coat the back of a spoon. If it still looks watery, give it another minute or two, but keep the heat at a steady simmer rather than cranking it up; high heat can make the sauce look thick in the pan while still tasting loose on the plate.
Coating and Serving
Return the chicken to the skillet and turn it until every side is lacquered in the glaze. Let it cook just long enough to finish at 165°F and pick up some of the sauce, then pull it off the heat. Finish with sesame seeds and green onions while the glaze is still hot so they stick in place instead of sliding around.
How to Adapt This Chicken When You Need a Different Finish
Gluten-Free Version
Use tamari instead of soy sauce. The flavor stays savory and balanced, but tamari usually tastes a little rounder and less sharp. Everything else stays the same, so you still get the same sticky glaze.
Chicken Thigh Swap
Boneless thighs give you a juicier, more forgiving result and handle the glaze beautifully. They usually need a few extra minutes in the skillet, but they’re much harder to dry out than breasts.
Lower-Sugar Balance
You can trim the honey slightly and add a touch more vinegar for a less sweet glaze. The sauce will still cling, but it’ll taste more savory and less candy-like. Don’t cut the honey too far or you’ll lose the glossy coating that makes this dish work.
Make It a Full Bowl Dinner
Serve the chicken over steamed rice with quick broccoli, snap peas, or shredded cabbage on the side. The glaze soaks into rice nicely, and the vegetables keep the dish from feeling too heavy.
Storage and Reheating
- Refrigerator: Store in an airtight container for up to 4 days. The sauce thickens as it chills, which is normal.
- Freezer: It freezes well for up to 2 months, though the glaze may loosen a little after thawing. Freeze the chicken and sauce together in a sealed container, then thaw overnight in the fridge.
- Reheating: Reheat gently in a skillet over low heat with a splash of water to loosen the sauce. The common mistake is blasting it in the microwave until the chicken turns rubbery and the glaze gets sticky in the wrong way.
Answers to the Questions Worth Asking

Honey Garlic Chicken
Ingredients
Equipment
Method
- Season the boneless skinless chicken breasts with salt, pepper, and garlic powder, then sear in olive oil in a large skillet over medium-high heat for 5-6 minutes per side until golden. Remove when the internal temperature reaches 165°F.
- In the same pan, cook the minced garlic in butter over medium-high heat for 1 minute until fragrant, scraping up browned bits. Stir in the honey, soy sauce, and rice vinegar.
- Stir in the cornstarch slurry (cornstarch mixed with water), then simmer for 2-3 minutes until the sauce thickens to a sticky glaze with a glistening sheen. The glaze should visibly coat the back of a spoon.
- Return the chicken to the pan and turn to coat in the honey garlic glaze. Cook for 1-2 more minutes so the sauce clings and lightly blisters.
- Garnish with sesame seeds and sliced green onions. Serve immediately over steamed rice so the glaze stays glossy.


